How do I add AT into a program?

KCAT Block Print Image

Alexander Technique examines three components of self: physical, mental and emotional to form whole body and how you respond to your environment. Acknowledging how your whole body relates to objects and situations can change the preceding actions for the better. Individually any of the four may nurture or corrupt the body.

The Alexander Technique can be incorporated when addressing PTSD, anger management, social acclimation, pain, stress and repetitive motion.

Recognize stress and tension held within your body. Develop an understanding of personal triggers and learn reliable tools to aid in healing and health. Alexander Technique can promote long and short-term well-being.

Group classes can be arranged to meet the needs of your particular situation. Care givers, veterans, repetitive motion employees, chronic pain- these groups can benefit integrating Alexander Technique into their lives. Consistent group classes will aid in long term well-being.

Contact Molly to discuss how adding group classes can improve work place environment, care and comfort.


Calendar

PRIVATE LESSONS:

During this time of social distancing, lessons are only available online. We can set this up through Zoom, Skype or FaceTime.

Email me: kcatlesson at gmail.com or Call: (989) 506-5327.

The calendar below offers times that private lessons can be scheduled at the studio.  The times are listed at “Lessons Available”. Contact me to set up the lesson, studio is not open unless the lesson is scheduled through me.  Other times may be available, email to find a time that works best for you. Contact me to set up each lesson.  kansascityalexandertechnique at gmail dot com  (989) 506-5327.

Calendar includes Group Classes. Find out more here.

Click on times to find out more information.


Why Musicians Get Injured and How Alexander Technique Can Help

Successful musicians have devotion; a strong committed passion that transforms into hours spent practicing alone, additional hours of group rehearsals, often in tight spaces. There are two basic playing options- sit or stand, with some instruments only a stool will work. The finger patterns and sense of touch must be precise and refined day after day. For a professional musician stakes are high, sound is affected instantly by small changes in embouchure, breathing, hands and the rest of the body. A musician’s practice requires consistent refinement and attention. Life as a musician is a life of physical endurance; that causes wear on the body. Alexander Technique is an educational system that teaches the practitioner how to reduce physical strain, allow body movement and find sustainable practices for life as a performer.

Why do injuries happen?

Injuries can happen for a variety of reasons: commanding the body to habitually play the instrument without ample movement, precise and repetitive motion, inability to rest during long rehearsals and the drive to get the music right. Sometimes, a musician can create undesirable habits by imitating an instructor or idol with poor habits or a different body type. As well, many musicians begin to play young; as they grow their body and mind may require a different approach. If you learned to play the violin when you were 8 and are now 45, the conditions of your physical self have changed, as well as how you use your body. The directions you were given may no longer apply, although without realizing you continue to follow outdated advice.

Though repetitive motion is common in many trades, the musicians’ scrupulous conditions and time restraints often force them to continue, even when their body screams- TAKE A BREAK! Musicians have refined their fine motor movements; the fingers, hands and wrists are critical to the outcome of the sound. The larger muscles in the arms, back, torso and legs need to stabilize for an extended period. These two together: refined small movements while large muscles are overworking to sustain a position or hold an instrument can be tiring. The rehearsal requires persistence in that moment and can therefore quickly spiral down, leading to pain and injury.

Injuries common to musicians:

There are two basic injury categories:

  • acute- sudden and short term
  • chronic– pain continues for three or more months

It is possible an injury can be both- “acute on chronic”. There are several injuries in both categories common to musicians: carpal tunnel syndrome, tendinitis, De Quervain’s tenosynovitis, bursitis and strained vocal cords, to name a few. Common areas of pain include back, neck, shoulder, arm and fingers. These injuries frequently occur because of overuse, misuse, lack of muscle support and bad luck. Here is a brief description of each:

Overuse– tightly holding the same physical position for extended periods of time without alternative range of motion options, change or rest causing stress in one or more area of the body.

Misuse– using your body in a way that defies natural physical design. This comes in numerous forms and can happen when you rely heavily on one part of the body without paying attention to the way you are using it or how it affects the rest of the body. Example: concentrating on your finger movement while ignoring the rest of your hand, arm, back and body.

Lack of muscle support- having underdeveloped musculature necessary for holding the instrument or position required. The physical stamina required is not necessarily built through rehearsals alone. Example: a professional athlete building upper body tone would do push-ups and the opposing muscle building exercise; pull-ups.

Bad Luck- being in the wrong place at the wrong time or are subject to something outside your control.

Injuries need to be addressed through various avenues:

Use common sense when addressing an injury: Are you in a lot of pain? Is it affecting your life? Do you wince when executing specific movements? If the answer is yes to any of these, medical treatment is recommended. Other ways to address the injury is dependent on the situation. The acronym RICE lists aid for acute injuries: rest, ice, compress and elevate swollen or injured areas. For some chronic injuries heat offers relief. By finding out what the problem is, it will be easier to address the injury. See a doctor or specialist if the pain is not going away, getting worse, or causing you concern. If recommended, get physical therapy and follow through with exercises, including strengthening exercises for overall physical well-being and pain management. Ask for recommendations- Is the doctor and physical therapist familiar with a musician’s life? Talk to your medical team openly about what you do as a musician. It is important to seek help sooner than later; as injuries get worse they take longer to heal.

I think of a musician as an athlete. Musicians work specific parts of their bodies for hours and injury affects productivity. The difference is that athletes tend to injure themselves through large muscle movements or blunt force, whereas musicians’ injuries are generally caused by fine motor skills or posture positioning. Musicians need to address their injuries just as a runner would their pulled hamstring. Long-term damage can happen if an injury is ignored.

If I am seeing a doctor would Alexander Technique still benefit me?

Yes, Alexander Technique can aid in the healing process. The best way to incorporate Alexander Technique into healing and pain management is to:

  • Identify what causes pain
  • Address how the movement choices can be different (re-mapping)
  • Prevent continual aggravation
  • Prevent compensatory injuries
  • Prevent future injuries from occurring

Alexander Technique can be helpful for preventative injury education, if injured, and in conjunction with medical treatment. Alexander Technique teachers look at your whole body, how you use it and its relationship to your environment.

Whole Body- psychophysical self- you are part physical, mental, and emotional; these cannot be completely separated. Furthermore, the entire body- backside, front-side; top half, bottom half; head, spine, arms, ribs, organs, pelvis, legs, feet; sensing yourself in entirety, instead of focusing on the pain or part in use.

Environment- the world you live in, both macro and micro. The chair you are sitting in, the people around you, the shoes on your feet.

Use- how you manifest physical movement and execute activities. How you fulfill what you do.

While addressing major pain with a doctor you can use Alexander Technique to investigate how you injured yourself, re-educate your body movements around the injured area, address overall body use, and improve your use in the long term. This education can be very helpful in the healing process and as a lifetime study to renew your playing. Incorporating whole body dissolves the juxtaposition of holding large muscles versus unrestricted small muscles. Throughout the lesson you foster the ability to include your environment and direct your thought process. As you heal, you are learning a new way to sit, stand, hold and play your instrument.

What will a lesson address when I am injured?

Generally, there are two major themes that are addressed with an injury. First, the injury is often a side effect of misuse in other parts of the body. So during lessons we integrate your body and movements. For example, a clarinet player is over extending their cervical (neck) and lumbar (lower back) spine to achieve an upright posture. She is also holding her shoulders to create stability while playing. For this student, I would address the relationship between the fingertips and back, all the way down to the feet and how she has ground support from the floor and chair. This would allow movement throughout the player’s back- ribs, spine and arms, changing how her fingers move on the keypads. By eliminating strain in shoulders, neck and head her fingers would feel less restricted. This is a different approach from working locally with how fingers move on the keypads; focusing in on a specific area of the body without attention to the rest. Second, injuries often cause trauma and we protect the injured area by avoiding in some way, this is called guarding. Guarding can be voluntary or involuntary and is a response to pain that leads to new habits, eventually causing new problems. Alexander Technique teachers will help to gently reuse the area in a way that is healthy and will lead to integration of mind and body; whole self. With injuries it is important to have ongoing dialog with your teacher throughout the lesson about pain or discomfort. A large part of the education in a lesson is listening and responding to your kinesthetic awareness (felt sense of self) and not suffering through pain. Movements are usually gentle and non-pushing, yet as you are the one experiencing the situation, you must speak up if you feel pain. A teacher cannot address what is not brought up in the lesson.

What is the time commitment needed to address pain through Alexander Technique?

Alexander Technique can help injuries, although it does not treat the injury specifically. Alexander Technique is not designed to eliminate six months of pain in one 50 minute lesson. If you are coming to the Alexander Technique because of an injury, I will first address the question: What medical resources are you using to manage the injury? For pain related to playing, I will also recommend many Alexander Technique lessons during a short period of time. Three, one hour lessons in one week is not out of the question and at least one lesson a week is important. If you are coming to Alexander Technique for other reasons, lessons can be less frequent. Many beginners come once a week or every few weeks, depending on circumstances. Think about how many hours you have put into training your body to move a particular way. If you are interested in changing these patterns it takes physical re-education, this takes time. The education in Alexander Technique builds upon itself; if you have habits of holding and tension that lead to pain, it will take attention and restructuring the way you think about yourself and use your body.

I cannot necessarily fix your pain today, but over time, you can learn to help yourself and live without or with less chronic pain. If you are pain free, the benefits of the Alexander Technique are still valuable to your playing. Some benefits from long term Alexander Technique study at Kansas City Alexander Technique include:

  • Letting go of a fixed idea of what or where your problem is and finding freedom in relating to yourself in a new way.
  • Identifing ground support and moving from the stability of ground.
  • Approaching familiar activities with a sense of newness each rehearsal.
  • Finding movement understanding within seemingly held positions.
  • Apply playing your instrument and how it relates to your physical structure consistently over time, to enhance your comfort and ease.
  • Integrating inhibition or pausing to include more, a term developed by F.M. Alexander; instead of block out, as is the definition used by Sigmund Freud.
  • Learning to redirect; thoughts guide movement (and cause) action; to change your use, you redirect your thinking.
  • Self directed rest as a part of your daily practice to enhance your body awareness as well as your movement awareness while playing.
  • Body mapping, a technique of learning about anatomy and applying directly to your own movement choices.
  • Breath awareness and understanding.

It is easy to think only about the parts you use most: fingers, arms. There is a system of support within you that is reliable if given attention. Time spent learning about the stability of bones, the strength of muscles, the stacking of organs upon themselves will refine your physical understanding. As humans, we each have the ability to “right” ourselves. Humans were not designed without structure, like an amoeba. Without support in your body, you would be a puddle on the ground. Human bodies are designed to be upright. As a child you sought out this ability and it can be accomplished again without excess effort. The Alexander Technique seeks to regain the ability to relate and respond easily to your musical instrument while supporting your upright stature.

If you would like to talk about Alexander Technique please contact me through your preferred communication: email: kansascityalexandertechnique at gmail dot com, (989)-506-5327, 30 minute tour of the studio with discussion and Q&A or schedule a lesson (fees apply.)


How We Breathe

Written by Molly Kampf
Copyright 2018

Breath is happening. Without conscious thought,

our body naturally regulates and performs this activity.

So what is breathing?

Breathing is an involuntary activity that provides our bodies with fresh oxygen and rids us of carbon dioxide. We sleep, talk, eat and go up and down stairs while our bodies coordinate the incoming and outgoing air. Without thinking about breathing and we are able to thrive on its outcome. There is also some conscious control over this involuntary action of our body. Therefore, at some point we do think about breath – we take a deep breath to focus, we guide it during exercise, while we are singing or just because. The way we think about how we breathe can affect it; and the tendency is to take over and improve what is already happening. F.M. Alexander said this; “If I breathe as I understand breathing, I am doing something wrong.”¹  Meaning we can interfere negatively if the assumed directions are contradictory to organic breathing. This article will clear up some possible misconceptions about breathing and detail parts that are often reduced to a quick easy phrase that fails to explain what is actually happening during respiration.

A student I will call Becky asked me once why she needed to know about breath. As a dancer and undergraduate student, Becky spent a lot of time moving, studying at a desk or sofa, carrying heavy books, rushing and stressing about her workload. I noticed that she held her breath when she was talking, picking up her bag and thinking. When she was tired or talking about stressful topics, she would hold her breath and let it out quickly after she spoke. There were two reasons to address breath early in our Alexander Technique lessons together. First, breathing had no space in Becky’s stressful life. Second, her constricted breath was a holding pattern that included other parts of her body- her arms, ribs, neck and head. For Becky to free herself from this holding pattern in other areas of her life she had to first regain the movement that organically happens when breathing.

As an Alexander Technique teacher, I don’t tell you what you are doing wrong, I help you to become more aware of your body and movement so that you can find what works and what doesn’t, and understand why. I educate using directions and physical relationships in your structure, as well as my hands* to guide your alignment or help you notice a specific occurrence. Along with the hands-on part of Alexander Technique, in my practice I use anatomy-based image, video, description and a technique called body mapping. Body mapping, as developed by Barbara and William Conable, is a way of learning anatomy and specifically applying the teachings to your own body, movement, and in this case, breathing. Often when people look at the size of the lungs for the first time, they are surprised at how large they are, and that part of the lungs are in their armpit region and just below their collarbone. Some of the anatomy-based education taught in a particular lesson may include: bones (their shape and size), joints (hinge, ball and socket, pivot, gliding- each move differently), muscles (the way the fibers stretch and where they connect), organs, and systems (nervous, respiratory, circular, etc.). As you clarify the physical map in your mind and bring awareness to the sensation of that area, subtle movement becomes noticeable and large movement becomes easier.

A memorable lesson with Becky started with her sitting in a chair. As she sat there I talked about the stability of the ground and the hard chair with a back that was supporting her. Next, I brought her attention to her ribs against the back of the chair and for her to feel how they moved up during her inhalation, back down during her exhalation. Becky was surprised how easy it was to ignore this sensation even through it happened frequently. The lesson continued with using my hands to gently guide her awareness to the ribs in back and at the side, as well as her neck and head. While I worked with her using my hands, I continued to describe the movement happening during breathing. At the end of the lesson, I had her put on her backpack and feel these same occurrences.

Throughout my practice I have observed a number of common misconceptions and questions that frequently arise when teaching breathing. Here are a few topics that surfaced during my lessons with Becky that demonstrate myths I frequently encounter:

  1. Breathing begins at our nose or mouth when air enters our body.
  2. Breathing from the belly creates a full breath.
  3.  Our chests rising and lowering is what moves air in and out of our body.
  4. The inhale and exhale should be the same length.

I will further discuss each of these myths below for you to gain a more detailed outlook on breathing.

Myth #1: Breathing begins at our nose or mouth when air enters our body.

From the outside eye, it appears that breathing begins when air comes through our nose or mouth. Actually, the act of breathing begins before this, and air moving in through our nose or mouth is the result. Let’s go through a breath from the very beginning. First, there is a call from the body to the brain for action, and a response from the brain to begin. Increases in carbon dioxide levels in the blood stream signal the part of the brainstem called the medulla oblongata to increase the respiratory rate and begin the inhalation. Next, is the first visible movement: the contraction of the diaphragm, quickly followed by the contraction of the external intercostal muscles and scalene muscles. It is through the major work of the diaphragm that the rest of the body responds and achieves the inhalation. The diaphragm moves our organs down and away to make space for the lungs to expand and receive oxygen. In the other direction, the external intercostal (between ribs) and scalene muscles (part of neck) increase the dimension of the rib cage by lifting and widening the ribs. In the space created by muscles moving in opposite directions, alveoli; the tiny air sacs at the edges of the bronchioles enlarge, generating a pressure change in our lungs. Air flows from places of high pressure to lower pressure. As the pressure changes in our lungs becoming lower than the atmosphere outside of our body, air enters through the nostrils or throat; then flows down through the larynx, trachea branching into the left and right bronchus, branching more into many bronchioles and into the alveoli. This air enters because of this pressure change, not the action of sucking air in via musculature use. In the alveoli, oxygen exchanges with carbon dioxide. Once they have switched places, exhalation begins; the oxygen diffuses into our blood stream and the carbon dioxide travels up the same pathway and out through the nostrils or mouth²·³. (See #2 for more details about exhalation.)

On average a healthy adult at rest breathes 12-20 times per minute and sighs every 5th or 6th exhale. Yet, there are extremely precise conditions within our body that the breath regulates. This all is part of healthy functioning lungs. The variance allows for alveoli and cell function as necessary to serve greater responsibilities- health and pH balance within the body through the respiratory and circulatory system²·³. I am not telling you this to have you start counting and changing patterns to be sure you are in this zone. I’m telling you this so you can marvel at what an incredible range there is! Even at rest, you could breathe almost twice as many times and stay within an acceptable range.

It is difficult to feel the diaphragm work, and because it is a powerful and automatic muscle, it is best left to its own task without interference anyway. The diaphragm is responsible for about ¾ of the muscle action of inhalation, with the external intercostal and scalene muscles performing the other ¼ work. It is easier to feel the result of the action of our diaphragm- our organs shifting, as well as the result of changes of pressure in our lungs- air moving into our nose and mouth.   Nonetheless, the action of inhalation can be best described as beginning at the diaphragm. You can take your mind off breathing and know that you are alive and functioning; with blood oxygenating and carbon dioxide leaving the blood stream, all thanks to your diaphragm and your autonomic nervous system.

As I worked with Becky I introduced a few anatomical terms; muscle contraction (work) and how the muscle fibers tighten when this happens. We traced the bottom and top of her ribs, and counted ribs to find the bottom of the diaphragm as well as the shape of her lungs. I don’t expect students to memorize body parts, attachment locations or the specifics of the oxygen pathway. There is never an expectation of having prior knowledge or retaining specific anatomical terminology. I am more interested in students having a visualization combined with kinesthetic sensation.  This is how Becky was then able to sense the rib movement within her own body while sitting in a chair.

Myth #2: Breathing from the belly is a full breath.

“Breathing from your belly” is a phrase often used that can create misconceptions about how much muscle is needed to breath as well as the exact location of various body parts. Movement in the belly is a result of your diaphragm’s descent making your digestive organs slide down and away. This powerful muscle is the separation between our thoracic cavity (heart and lungs) and the abdominal/pelvic cavity (digestive system and other organs). The diaphragm is located beneath the lungs and is shaped by the organs below that rise up beneath it. The diaphragm is a muscle with a strong central tendon. It is shaped much like a dome, ascending into the rib cage and down lower at the spine.   It attaches to bone in the front at the xiphoid process (lower sternum), the inner surface of the lower six ribs, and the top three lumbar vertebrae. Its job is to move down and spring back up, always in constant relation to the organs surrounding it; both above and below. Look at the images below:

4
Image 1 websier5

Image 2 website

6Image 3 Website

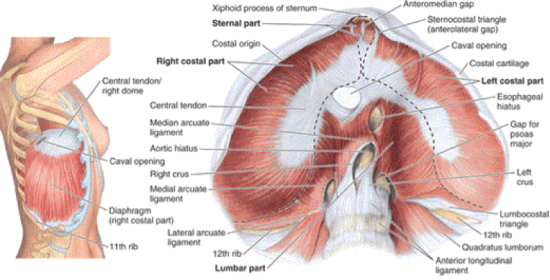
This dome lowers about 3-8 centimeters during inhalation and then retreats back up during exhalation. The variance of this measurement is due to size, health, age and breath. The diaphragm muscle is contracting (working) when it goes down and is relaxed as it goes back up. A full inhale includes feeling a slight pressure down and out that begins at the thoracic diaphragm and goes around your ribs to the spine. This down and outward pressure can be felt all the way down to the pelvic floor. This movement is slightly more forward than backward, as the floating ribs and pelvis curve toward the front of the body.

In exhalation, the movement of the diaphragm upward is guided by the organs returning to their rightful place in and up not working muscles. Inhale creates exhale; the abdominal organs buoyantly go back in and up to their resting position, without having to engage abdominal and core muscles. Elastic recoil is an automatic and passive rebound of the ribs lowering and organs returning to their nestled position in and upward.   This automatic response occurs during exhalation; if you are quietly breathing, without force or need to assist, there is no muscle work.

As you read in Myth#1, the movement of the diaphragm is an involuntary reaction to the need for change in gases within our blood. Pushing your belly out and in with your abdominal and core muscles is a common misconception that you are breathing from your belly. The accessory muscles of exhalation are the abdominals and internal intercostal muscles. These are the working muscles if you are purposely forcing more air out with a deep exhalation, because of physical activity or health condition. These muscles are not working if you are quietly exhaling and not necessary for general breathing. We don’t need to force our breathing; we should allow it to happen.

As Becky learned to breathe without unnecessary work and gave a bit of attention to the moments when she was holding her breath, she was able to notice where she was within the breath.   Then she could remind herself of what comes next. She continued the extent of her inhale by thinking about the actual pathway of air and how it enters and exits the body.

Myth #3: Our chests rising and lowering is what moves air in and out of our body.

As you have already read, there are several parts that move during a breath. Our diaphragm, lungs, spine, ribs, organs and digestive system are the main movers when breathing. Some movement is quite subtle- like the spine. Some is easier to recognize- like the lower organs. Yet, all of these movements happen as a part of breathing, are involuntary and we do not need to interfere to make them occur or happen better.

 Try This:

Pay attention to your body and take a few breaths while thinking about “chest rising”. This is an action of lifting your rib cage and spine together up and down starting at your lumbar spine.   It feels like your sternum and rib cage moving through space. The movement of breath is different from this action.

Spending time examining the shape of a bone will help to understand how it moves. Each rib is round and curves individually from the sternum in front to its rightful vertebra in back. Collectively the ribs create the rib cage, although they each move marginally separate. Their movement is like a bucket handle, rising and lowering slightly. Look at the image below:


7

You can feel movement of the ribs not only as “your chest rising” but also as your sides and back expanding and rising as you inhale.

Now, try taking a few breaths as you think about how your ribs consist of front, side and back. It is not just your chest moving, but a circular “up” that happens when you inhale. If you are only thinking about your chest rising there is a lot of available movement you are missing in your inhalation.

On an inhale the movement of the:

Diaphragm- lowers and flattens.

Organs- pushed down and spread outward by the diaphragm.

Lungs- go forward, backward, upward and downward.

Ribs- spread outward and upward, with the external intercostal and scalene muscles located between and above contracting, all the way from the back, around our sides to our sternum, making space for the incoming air.

Spine- gathers moderately within its natural curves. (This movement is almost undetectable and should never be accentuated.)4

Arms- go along for the ride, receiving the ribs movement underneath, although are not actively involved.

On the exhale the movement of the:

Diaphragm- passively rises to its resting state.

Organs- rise and push the diaphragm up, all returning to their place of origin.

Lungs- passively returns to an unstretched state (elastic recoil); expel carbon dioxide with assistance from the push from the organs rising and ribs lowering.

Ribs- return downward (elastic recoil).

Spine- Lengthens within its natural curves. (Again, do not force this movement.)4

Arms- Continue their ride, as they are located on top of the descending ribs.

** Accessory muscles may be needed during labored breathing; COPD, asthma attack, forced breathing, etc.

Now that Becky has more information as part of her physiological self, she is able to include a clearer picture of her breath and body map. Becky came to my office one day and said, “Breathing stops my freak outs!” She went on to tell me how she was walking from one class to another with a friend, discussing their “to-do’s” for the weekend.   She was talking and walking, and the more she talked, the more she became overwhelmed. Then she remembered her new skill of body mapping and paying attention to herself and her environment. Becky gave her breath a moment of attention by listening physically, remembering what happens during the order of breathing, without forcing her breath. She noticed that talking about the stress was stopping her natural increase of air intake necessary as she walked. With her new way of thinking, Becky found it easier to take the next inhale. This altered her usual reaction of becoming increasingly overwhelmed, and she was able to avoid her typical “freak-out”. Instead, her breathing changed and continued as she walked and the stress became a conversation that established a plan of action.   She was involved in the solution instead of being held down by the workload.

Myth #4: The inhale and exhale should be the same length.

Our smart minds want to make inhalation and exhalation equal. This is not necessary or correct during normal activities or rest. Breath is like a wave; sometimes it is long, short, deep, shallow, quick or interrupted. Inhalation can be one length and exhalation another. There is also a slight pause between inspiration, expiration and the following inspiration. This hiatus varies with each situation, sometimes it can be miniscule or quite long, but it is a part of the wave like quality of breathing and is important to include in your map of breathing²·³.

The variances of breath are there to meet the needs of the greater picture: you living in a world that is ever-changing. Here are a few examples: When you meditate your breath will slow naturally because you are not using as much oxygen. When you exercise your breathing becomes quicker and deeper because your muscles release more carbon dioxide; your body needs to get rid of it and bring in more oxygen. If you are reclining in bed your breath will slow down and become shallow; as your body rests it needs less oxygen to function.

Everything we do creates its own unique breathing pattern that does not need us interfering with it. Yet, you may find that when you notice your breath, there is a fixed desire to take over. Instead, you can practice observing your breath, without meddling with the outcome.

Try this:

First, recognize how quick your mind is ready to take over and guide.

……………………………

……………………………

……………………………

……………………………

Okay, your mind can be bossy. Now that you have noticed this try a different approach:

“Flash in”, wherever you are in your breath and then go back to whatever you were originally doing. As quick as a camera flash, you can briefly feel your breath, notice where you are inhaling or exhaling. Simply feel that and then stop paying attention. Notice the sounds outside or the chair you are sitting in. By briefly observing you are able to peek at what is happening- movement, expansion, exchange, rest, and recoil. You are able to feel your body at its natural state within the ebb and flow. There is a great deal to observe and feel. With practice you will be able to listen for longer, and enjoy what you feel without changing the already occurring natural flow. There are many benefits to observing breath in its organic state. It helps create the conditions of listening to your body, a beginning step of Alexander Technique and other mindfulness practices such as meditation. You develop inner trust, which can be helpful during times of stress, being rushed or feeling unable to rest. This practice can become an ongoing lifetime investigation. You can use observing breath as a sensation of inner newness; each breath is new and unique. Let it be that, just as the oxygen is that comes into your body.

We think of breathing as an in-and-out process that moves air. It is so much more than that. Our respiratory system works directly with the circulatory system, which flows blood and delivers nutrients throughout all the cells in the entire body. Together the two systems keep our body energized, expel waste, and keep us in homeostasis.  What a relief we don’t have to think about that while also answering emails!

Becky found a way to pay attention to her body by listening and knowing that breathing was one thing she didn’t need to make happen. She started to separate her own human body from her to-do list and expectations. As our Alexander Technique lessons continued, we applied flashing in and listening as a base and examined her chosen response to other situations; ballet warm-up at the barre, typing at her computer, leading a group and giving a presentation.

Breath underlies movement in the body, so if your body is held in some way during breathing, this holding is carried on to other activities. Even when doing something that seems unimportant: chopping vegetables, walking or petting a dog- holding within yourself might still be present. In Alexander Technique, understanding and awareness of breath can be the first step toward speaking, singing, as well as other seemingly un-physical activities, like sitting in a chair.

*Although common and effective, hands-on guidance is not necessary or required to study Alexander Technique. Hands-on guidance is always used in accordance to student’s comfort level and request.

Edited by Jeffrey Biar and Laurel Perkins

_____________________________________________________________________________

Reference List

  1. Alexander F.M. The Alexander Technique The Renowned System of Mind-Body

Coordination. 3rd ed. Secaucus, NJ: Carol Publishing Group, 1995.2

2.  Jenkins G., Kemnitz C., Tortora G. The Respiratory System. In: Roesch B, ed.

Anatomy and Physiology. Hoboken, NJ: John Wiley & Sons, Inc.; 2007: 834-857.

3. Norris C.   Nursing Assessment Respiratory System. In: Green K, Horn J, ed.

Medical-Surgical Nursing Assessment and Management of Clinical Problems. 8th ed. St.

Louis, MO: Elsevier Mosby; 2011: 497-518.

4. Conable B., Conable W. How to Learn the Alexander Technique A Manual for  Students. 3rd Portland, OR: Andover Press; 1995.

5. Ibrahiam A. Muscles Involved in Respiration. Slideplayer.

http://slideplayer.com/slide/9683031/. Published Unknown. Accessed February 15, 2018.

6. Britannica. https://www.britannica.com/science/diaphragm-anatomy. Published July 20, 1998. Updated August 26, 2014. Accessed February 15, 2018.

7. Chapter2: Abdomen-part 2 Diaphragm. Health Appointments. https://healtheappointments.com/chapter-2-abdomen-part-2-essays/8/.   Publication unknown. Accessed February 15, 2018.

8. Premkumar K. Figure 3.21.brainKart. http://www.brainkart.com/article/The-Thorax_20921/. Published July 31, 2017. Accessed February 15, 2018.

Posture Lesson #1

Many people come to an Alexander Technique (AT) lesson to talk about posture. They want “better posture” and they don’t want to hurt or feel fatigued when having “good posture”. To address this frequent topic I wrote a sample introductory lesson. This lesson explains how posture applies to the Alexander Technique and how you can address your own posture. While reading, I want you to ask yourself: What is your personal definition of posture and how do you manifest this definition?

What is posture?
In The American Heritage Dictionary, the definition of posture is: a position of a person’s body or body parts: a sitting posture…; a characteristic way of bearing one’s body; relative placement or arrangement.1 What posture definitions fail to explain is that the manifestation of your posture can be moving and changing.
Posture should allow movement and change to occur, even within a seemingly still situation, like sitting in a classroom. You can see this clearly in a small child learning to sit or walk, they move as they balance- the movements are small and subtle but necessary to being a comfortable upright human being. As adults this movement is less noticeable, yet still accessible.

What is “good posture”?
Throughout life we are taught “good posture” and “bad posture”. As children we were told posture was important and even to “sit up straight.” With this demand for a straight back, the necessity to sit in a chair, concentrate for extended periods, and the instruction to “sit still” we started to deny the possibility of movement within our posture. Therefore, posture became a position. The “good posture” position may have been reinforced by being told: you look like you are paying attention, it is better for your back, and it will help you stay awake. Or alternatively, when you slouch you may be asked if you are paying attention, or told you look like a slob.
For many of us our “good posture” brought pain, tired muscles and antsy feelings. So, after a bit- you slouched. Slouching is an alternative sitting position, which brought invited relief from sitting “straight”. Any position that we are in for too long becomes uncomfortable, it just does. So maybe you developed a variation of your slouch, seeking rest, comfort and stability. Basically, over time, you developed a few positions to flip between whenever sitting, standing, and whatever else you may be doing.

Now, a few clarifications:
The word “straight” is often used when referring to the back; but the back is not straight. The term “back” is a generalization for saying spine, ribs, shoulders, pelvis, numerous muscles and other attachments. The shape of our spine affects the structural relationship to our head, ribs, arms, pelvis, and vise versa. Our spine has four curves in motion that absorb and cushion as we move. The spine works much like the shocks in a car, absorbing change and impact as we move while protecting the spinal chord and head. These curves are vital to our health and wellness. In most cases attempting to straighten the necessary curves of our back will only bring pain, tension and injury.

Our backs help balance the entire body. This includes the legs, head, arms and how we are interacting with the world around us; making coffee, carrying a gallon of milk to the table, or kicking a soccer ball. The human body, just like a skyscraper, needs movement to balance. You may not see the small movements of the body, but like the skyscraper these movements are just as necessary.

Revisiting our sit up vs. slouch- posture example, there are a few things that are working against us.
1. We have a fixed idea of what posture is; we think it is a position to hold.
2. We move to seek relief and find other (ground) support through slouching.
3. Our memories of posture interfere with how we sit- every time.

Note: For simplicity, this example refers to the posture of sitting. The posture lesson may also be applied to standing, walking and how we move throughout our day.

Incorporate anatomy into your posture:
You can be upright without feeling the desire to melt to the ground (slouch). We can begin to examine this by doing an experiment. Begin by taking a look at the curves in spine of this man.

spine from side

EXPERIMENT
Take a few minutes wherever you are sitting. Try to go from “straight” to slouch. Feel both positions by going back and forth, spend a minute in one then the other. Imagine your own spine and how you change the natural curves. Describe to yourself how your spine’s curves are currently shaped as you feel each position.

When in “good posture” we stiffen, resisting movement. We lift ourselves up, instead of feeling the support we have from gravity and allowing balance to happen. We force the position, using too much muscle. Most importantly we stop the small physical movements inherent in us that eliminate the effort of being upright.

When we slouch we are over extending certain curves, while tightening the opposing curves. Slouching creates an unbalanced distribution of pressure throughout the body, which can cause strain, injury, fatigue, and chronic pain. Like sitting straight, over time slouching will also have an adverse impact.

Now, try a place in-between, where you are not stuck in either position. In this place you are not lifting up and not pulling down. Recognize where you are in contact with support: the bottoms of your feet on the ground, back of the upper legs and pelvis on the chair, your back against chair, your arms are resting on your body or an armrest. See your surroundings. Include what you are thinking about and how you feel in the experience. Over time, by returning to, and getting to know this greater awareness you may discover a new relationship with your body in space. An AT teacher would help you find and understand this movement in space within your unique circumstances.

Your new relationship may allow for an upright alignment without holding and pain.

Adults are not used to feeling these small movements, we are used to the big stuff- pushing a door closed, picking up grocery bags, moving the couch, downward facing dog. Feeling the small movements that we use in balance requires slowing down and engaging in physical listening; paying attention to subtle movement and acknowledging what is physically happening. Once you are able to notice, then you can speed back up.

The Alexander Technique teaches that posture is dynamic; meaning human beings should allow movement when we sit at the computer or stand in a check out line, instead of being stiff. When sitting you can allow relative adjustments to happen, they just happen all on their own. When we hold, we stop the movement, making it difficult and uncomfortable to sit for a long period.

This is an example of a lesson on a specific topic. Some people come to address specific topics: how they type at a computer, talk in front of a group, play an instrument, others just show up: they have pain, want to be more present in their day, or are curious. We begin to work together, generally with hands on teaching, and various topics begin to emerge: breathing, thought patterns, moving your arm, walking, resting, putting on your jacket, sitting at a piano, holding a musical instrument, just to name a few. To find out more, contact Kansas City Alexander Technique at kansascityalexandertechnique@gmail.com or (989) 506-5327, I am happy to discuss how you can incorporate the Alexander Technique into your life, answer any questions, and set up a lesson.

***This is a general introduction to help you understand what Alexander Technique is and how it can be helpful to you. Working with an AT teacher in the room, you will receive direct information and feedback that is particular to you and how you move.

References

1. Definition posture. The American Heritage Dictionary Dictionary site. https://ahdictionary.com/word/search.html?q=posture&submit.x=0&submit.y=0
Updated 2017. Accessed March 19, 2017.